What I did to make this video:
- Layered the four images on top using the 'Screen' method of blending (just like you might in Photoshop)
- Animated the 'opacity' of each so that they fade in and out of each other
[An 'adjustment layer', in case you've never used one in photoshop, lets you apply one or more effects to every layer below it, without having to apply it to every layer or merge the layers to one image first]
- Added an adjustment layer with a colorize effect to make the light- and mid-tones brown, and another to make the dark tones red. Then I animated it to increase teh colorization over the course of the video.
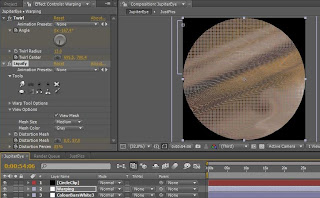
- Added an adjustment layer to 'warp' the video, to emulate the movement of clouds on the surface. The bands were done by manual smearing, and the effect around the dot was done using the 'twirl' effect. Both were animated over time, like above.
- More adjustment layers were added to alter the hue and lightness, using masks to isolate areas and create the bands of white and red. Again, this was animated to fade in.
- Finally, the image was cropped into a circle using a black solid and an inverted mask.
Warping: The movements of Jupiter's clouds was drawn manually using a mouse and the distortion amount increases over time. The twirl effect was added at the eye. Both move around a little to best fit the current photograph.


Format type:
I rendered the video to the uncompressed format first to keep the highest possible quality although This gives maximum quality, but the file size is huge so I have to change the file to the a compressed video, instead of storing every frame as a fresh image, just stores the differences between frames and does a bit of clever manipulation to reduce the file size at the expense of detail where changes are subtle A MOV file is actually a 'shell' for a video. Most kind of video formats can be put into a MOV shell. The codec I used to compress this one is called H.264.
Eye's planet Phenomenon second draft from Arezoo niknafs on Vimeo.


No comments:
Post a Comment