Eye's Planet Phenomena final draft from Arezoo niknafs on Vimeo.
Wednesday, 16 December 2009
Sunday, 13 December 2009
Artist Statement
Eye’s planet Phenomenoa
In 2008 I started showing interest in scientific photography and looking at many of the subjects, which are recorded specifically because they have not been observed before, or cannot be observed directly.
I try to envisage how these images can be pleasing to the eye or even inspirational, since they often reflect aspects of the natural world, of science, and of technology that are not easily observed.
I develop my interest in scientific photography after starting a part time job at St Helens hospital as an Ophthalmic Photographer
During my work I have recognized a fascinating visual connection between medical fundus photographs (of the back of the eye) and imagery of Celestial objects such as Jupiter. This interesting visual connection leads me to reflect this similarity through the animation of my photographs by making a short video. Through this I hoped to try to capture the sense of wonder that I feel towards astronomical objects and the intricacies of the human body.
Drawing inspiration from Edward Muybridge’s work studying movement, I hoped to translate some of his innovation and technical approach to photography to the modern world.
6th and 7th draft animation
Saturday, 12 December 2009
Planet's pictures
"These first raw images are spectacular, and paint an even more fascinating picture of Enceladus," said Bob Pappalardo, Cassini project scientist at NASA's Jet Propulsion Laboratory in Pasadena, Calif. "The Cassini teams will be delving into the data to better understand the workings of this bizarre, active moon."
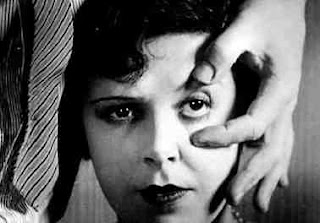
Un chien andalou
Thursday, 10 December 2009
Fifth draft animation
Wednesday, 9 December 2009
Forth draft animation
Form: In the second animation draft where I tried to emulate the forms of the planet, with the spot and the line clouds , didn't work and looked really cheesey. The photographs already have beautiful forms, but they don't have colour or movement, so I decided to add colour and movement to reflect Jupiter, while keeping the forms of the original images.
Colours: After sharpening and applying a contrast curve, the photographs were coloured. The three major colours of Jupiter are beige/brown, white and dark red. The colourless photographs were recoloured to match those: first, the whole thing is 'colourized' to beige/brown; the high-luminance parts were then recoloured using 'Change to Color' to make them white and washed out (I also slightly changed the hue to a purple that seemed to fit well at the edges of the spots). Likewise, the very dark parts were recoloured to red.
Movement: Each photograph moves slowly horizontally in the frame, behind the circular clipping mask, to emulate planetary rotation. A subtle liquid effect is applied to give the surface forms a little bit of movement, like rolling storm clouds--the effect used was 'turbulence displacement', set to warp only vertically. Each image layer is staggered over time and the opacity animated, just like in all the other videos; however, the blending mode was change to 'Exclusive' (instead of 'Screen') so the images interact with each other in more interesting ways during the transitions.
Sound: The animation is about 1min and 20sec long.The original sound from NASA is only 45 sec. I asked one of my friend who is an Electronic music composer to make it one long sound that matches the video length and positioned so the intense parts of the sound match the intense parts of the video (large white sections).
Eye's Planet Phenomenon 4th draft from Arezoo niknafs on Vimeo.
Saturday, 5 December 2009
Third draft animation
Eye's Planet Phenomenon third draft from Arezoo niknafs on Vimeo.
Second draft animation
What I did to make this video:
- Layered the four images on top using the 'Screen' method of blending (just like you might in Photoshop)
- Animated the 'opacity' of each so that they fade in and out of each other
[An 'adjustment layer', in case you've never used one in photoshop, lets you apply one or more effects to every layer below it, without having to apply it to every layer or merge the layers to one image first]
- Added an adjustment layer with a colorize effect to make the light- and mid-tones brown, and another to make the dark tones red. Then I animated it to increase teh colorization over the course of the video.
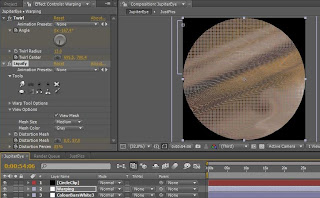
- Added an adjustment layer to 'warp' the video, to emulate the movement of clouds on the surface. The bands were done by manual smearing, and the effect around the dot was done using the 'twirl' effect. Both were animated over time, like above.
- More adjustment layers were added to alter the hue and lightness, using masks to isolate areas and create the bands of white and red. Again, this was animated to fade in.
- Finally, the image was cropped into a circle using a black solid and an inverted mask.
Warping: The movements of Jupiter's clouds was drawn manually using a mouse and the distortion amount increases over time. The twirl effect was added at the eye. Both move around a little to best fit the current photograph.


Format type:
I rendered the video to the uncompressed format first to keep the highest possible quality although This gives maximum quality, but the file size is huge so I have to change the file to the a compressed video, instead of storing every frame as a fresh image, just stores the differences between frames and does a bit of clever manipulation to reduce the file size at the expense of detail where changes are subtle A MOV file is actually a 'shell' for a video. Most kind of video formats can be put into a MOV shell. The codec I used to compress this one is called H.264.
Eye's planet Phenomenon second draft from Arezoo niknafs on Vimeo.
First draft animation!
Here are some of the screenshot from the first draft animation:
- This image shows how i created the circle from a solid layer and the mask:
- This image shows the photographs staggered over time:
- This image shows how I animated the size of the mask to reveal each new photograph:
- This image is the finish product before the rendering(to view the final product as a movie file can be play on computer/or burn on to the DVD ):


